Overview
Driving from Kathmandu to Jiri (2,100m) takes about 6 hours. The trek to Everest Base Camp (EBC) follows the traditional route taken by the early Everest expeditions and still serves as the main artery to the roadless Sagarmatha (Everest) region. Known as the Solukhumbu, it is the home of the Sherpas. This relatively tiny society of 8,000 people is the best-known and most admired of all Nepal's ethnic groups. According to their oral history, Sherpas migrated to high valleys south of Mt. Everest from eastern Tibet about 450 years ago, hence the name Sherpa, "people of the east." Many families along this route have converted their homes into trekkers' lodges catering to foreign hikers.
Trekking through the Sherpa villages, we share many of their hearths and enjoy their generous hospitality. Trekking from Jiri has the advantage of helping you to acclimatise on route. This trek is about 190km/120 miles long, and the total altitude gained on the innumerable uphill portions totals 9000m - much higher even than Mt. Everest! After Namche, we follow the main trail to the base camp with all its attractions. Legendary trekking to a legendary destination - Everest Base Camp in Nepal.
Highlights
- Scenic view on the way to Jiri
- Pristine terraced farmlands, Himalayan scenery, and the beautiful Dudh Koshi River
- Alpine forests, ice-cold rivers, astonishing rhododendron, and pine forests
- Magnificent mountains, high passes, attractive monasteries, and meeting friendly local people
- Plentiful time to spend on the extended pastures, yak farms, glaciers, and adequate time to acclimatise en route
- The native land of the Sherpa people, their culture, lifestyle, and picturesque villages
- Stunning beauty of the Khumbu Glaciers and Khumbu Icefalls
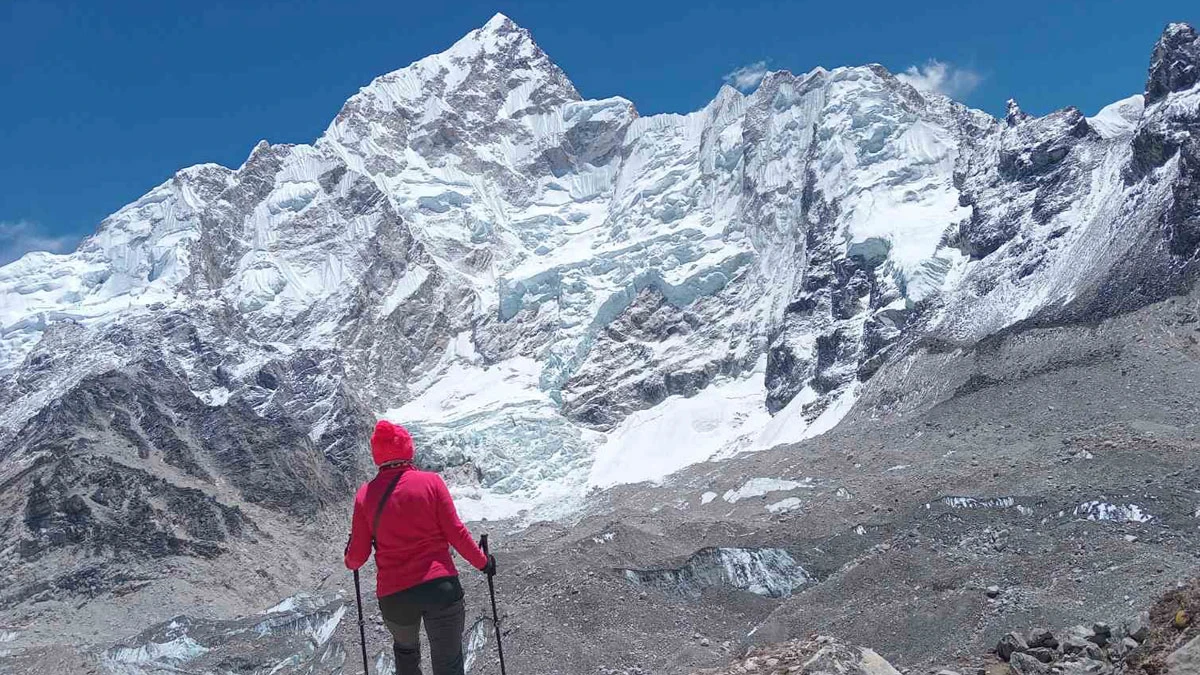
- Relish the stunning sunrise view and witness the intense panoramic mountain views of Mt. Everest, Mt. Nuptse, Mt. Lhotse, Mt. Pumori, and Mt. Ama Dablam from Kalapatthar
Day-to-day Itinerary for Jiri Everest Base Camp Trek
Day 01: Arrival in Kathmandu
Day 02: Kathmandu to Jiri (by bus), Jeep drive to Bhandar (2250 m.)
Day 03: Bhandar to Sete (2520m.)
Day 04: Sete to Junbesi (2580 m.)
Day 05: Junbesi to Nunthala (2200 m.)
Day 06: Nunthala to Bupsa (2360m.)
Day 07: Bupsa to Cheplung (2700 m.)
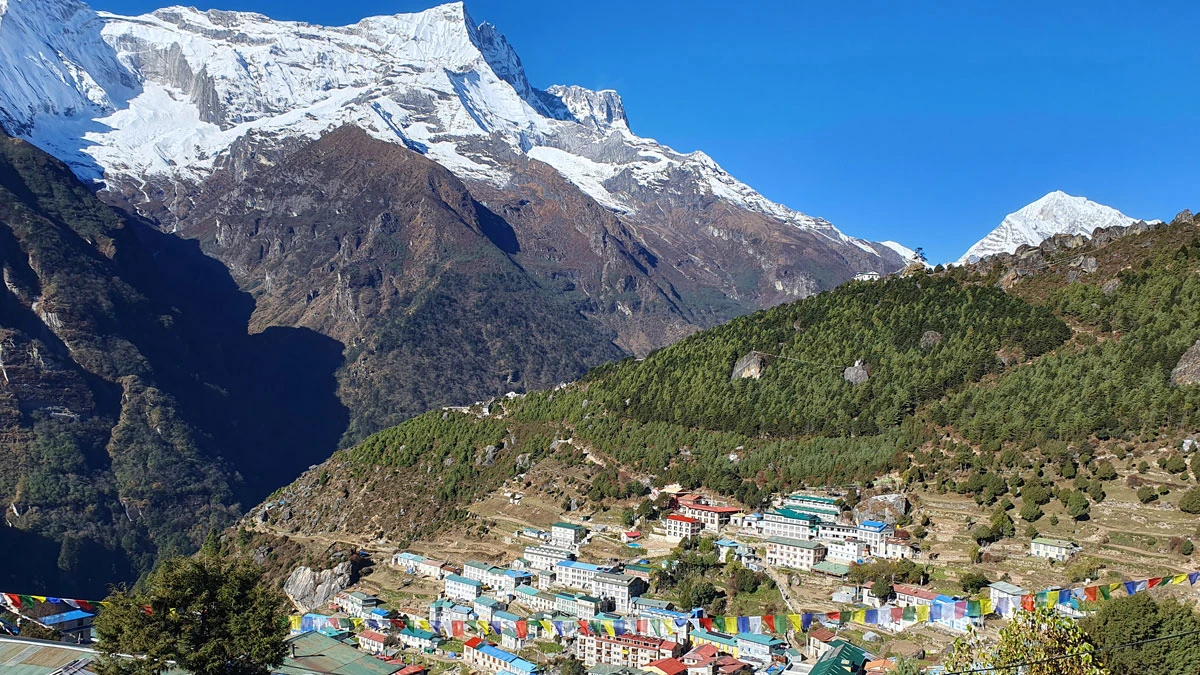
Day 08: Cheplung to Namche Bazaar (3440 m.)
Day 09: Acclimatisation day
Day 10: Namche to Tengboche (3940m.)
Day 11: Trek to Dingboche (4350 m.)
Day 12: Acclimatisation Day
Day 13: Dingboche to Lobuche (4910 m.)
Day 14: Lobuche to Everest Base Camp (5364 m.), back to Gorakshep
Day 15: Kalapatthar hike (5644.5 m.), trek down to Pheriche (4200 m.)
Day 16: Trek to Namche Bazaar (3440 m.)
Day 17: Trek to Lukla (2860 m.)
Day 18: Flight from Lukla to Kathmandu
Jiri to EBC Trek informations
Accommodation
Accommodation in the Himalayas is mostly teahouses or lodges operated by locals. They are comfortable and simple with basic facilities. Extra facilities like hot showers, Wi-Fi, charging of electronic devices, and laundries are available for an additional charge. Room sharing is common during the peak seasons and at high altitudes. So, be prepared for it. Washrooms are mostly outside the teahouse or lodge.
Meals
We provide only breakfast in Kathmandu, and 3 meals (breakfast, lunch, dinner) a day are provided during the entire trek. Meals are provided from the teahouses or lodges, which are simple but organic and healthy. Nepali Dal Bhat is a chief dish with fresh green vegetable curry. Besides, noodles, soup, bread, roti, Sherpa stew, and hot drinks are also available. You can try continental cuisine at Namche at your own expense.
Drinking Water
Drinking water in the Himalayas is pure and fresh. One can directly drink the natural freshwater stream from the Himalayas. Or fill up the boiled water in a water bottle in the teahouses, paying an extra charge. Always carry water purifying solutions for proper water treatment and to be safe. Drink plenty of water and keep yourself hydrated to prevent altitude sickness.
Internet connectivity & Mobile Network
Everest Link’s Wi-Fi card provides internet all over the Everest region. So, internet connectivity is easily available and stable in the lower regions. Mobile Network is also stable in the lower regions. You can also purchase a SIM and use mobile data from it. In higher altitudes, internet connectivity and mobile networks are difficult to find.
Jiri to EBC Trek Starting Point
Bhandar is the starting point of the trek from Jiri. A drive from Kathmandu to Jiri commences. Then, a short jeep ride to Bhandar from Jiri commences. The trek journey officially starts from Bhandar.
Bhandar-Sete-Junbesi-Nunthala-Bupsa-Cheplung-Namche-Tengboche-Dingboche-Lobuche-EBC-Gorakshep-Kalapatthar-Pheriche-Lukla
What permits are required for Jiri to EBC trekking?
Permits are mandatory in the Himalayas of Nepal. Our required permits are the Khumbu Pasang Lhamu Rural Entrance Permit and Sagarmatha National Park Permit (SNP).
1. Khumbu permit costs: NPR 3000 (Foreigners), NPR 3000 (SAARC)
3. Gaurishankar Conservation Park permit
2. SNP permit costs: NPR 3000 (Foreigners), NPR 1500 (SAARC)
"DH Treks issues all the required permits for its clients."
Travel Insurance
Travel Insurance is quintessential in the Himalayas. It must cover all emergency evacuations, medical emergencies, luggage loss/theft, flight cancellations, altitude above 4000m, etc. Thus, arrange travel insurance from a reputed agency as it is compulsory.
Safety and our guides
We assure you 100% when it comes to safety. Our client’s safety is our main concern. Our guides are certified and well-trained with years of expertise in this field. They are technically competent and have excelled in safety performance. They always carry essential safety equipment, gear, and first-aid kits. For the safety of our trekkers, the itinerary is properly scheduled, and acclimatisation rest days are properly set up to adjust to the high altitude and prevent altitude sickness. If any queries concerning safety, feel free to share them with our guides. We are always there for your service.
When is the best time for Jiri to go on the Everest Base Camp Trek?
The best time to trek is the peak season for safety and to enjoy the spectacular and clear views. Spring and Autumn seasons are the best time, followed by the summer season. The winter season is risky, and only a few adventurous dare to climb. We recommend you plan carefully if you want to trek during the off-season.
How difficult from Jiri to EBC Trek?
The Jiri to EBC Trek is full of challenges due to its long trek route, high elevations, and physical demands. With the proper assistance and guidance of experts, it is achievable. When it comes to the Jiri to EBC Trek, experience in trekking at high altitudes is a bonus. Besides this, trekkers must be in good health and physically & mentally fit, as it is physically demanding. So, we recommend you participate in exercises and physical training months before starting the trek. Also, take necessary health tests before trekking to high altitudes. You can completely trust our assistance and guidelines throughout the trekking journey.
Altitude Sickness & Acclimatisation
Altitude sickness is common in mountains above an altitude of 3000m. The trek starts from Bhandar (2250m) and the altitude rises to Kalapatthar (5,644.5m) during the trek. Namche and Dingboche are acclimatisation resting places to adjust to the altitude and prevent altitude sickness.
Symptoms of Altitude Sickness
Primary: Headache, nausea, gasping, appetite & sleep loss, dizziness, fatigue, vomiting
Extreme: Primary symptoms and hallucinations & unconsciousness
Preventive Guidelines
- Immediately inform the guide
- Warm up and body stretch before the trekking journey
- Drink water and hydrate yourself at regular intervals
- Frequent urination throughout the journey
- Ascend slowly and gradually
- Take plenty of rest and sleep
- Avoid salty foods, alcohol, and smoking
- Descend immediately when it’s difficult/uneasy
- Take medicine after consulting a guide
Equipment
-
Shoes:
- Trekking shoes, crampons, base camp shoes, and rubber sandals
-
Clothes:
- Windcheater jacket, Thermals, Down Jacket, Base Layers, Fleece, long-sleeve shirts, Gloves, Towels, Inner garments, Trekking pants, Trousers, Shorts, Socks
-
Accessories:
- Sunglasses, Ski Goggles, Hats/Caps, Beanie, Sunscreen, Lip Balm, Head Lamp, Pocket Knife, Personal Hygiene &Toiletries
-
Sleeping:
- Warm and lightweight sleeping bags
-
Travel Bag:
- Duffel bag, a day pack, and a pack cover
-
Medicine Kit:
- Wash Kit, First-Aid Kit, Blister Repair Kit, Medicines for preventing Altitude sickness, Prescribed Medicines (Personal use)
-
Extras:
- Heat/Leak proof water bottles, Water Purifying solution (Iodine based), Water filters, Insulated cup/flask, Map, Binoculars, Travel Documents, Sewing kit, Cash, Extra batteries, Power bank, Pen, Diary, Book, Reusable (spoon, cup, plate), Reusable bags, Large Waterproof Disposable Bags, Snacks (Choco-bars, Mints, Nuts, Granola Bars)
Note: Customise and rent the above list as necessary.